Channels - Depth and lighting
Channels are good for lot of things, but here we're going only to speak about how to create depth and lighting with it, hence the title. This is more like the bump mapping texture in 3d apps or like most of you might be aware of, the bump feature in the quake engine or, more recently, the hardware bump maps supported by 3d cards like the Matrox G400.
It's easily very impressive and it is so especially in animations or when it moves. Unfortunately were only going to use Photoshop to come up with a still picture, or more specifically a texture. It's a great way to come up with depth for a texture or design and at the same time give it some realistic lighting. The uses are endless, thus making your imagination the only barrier.
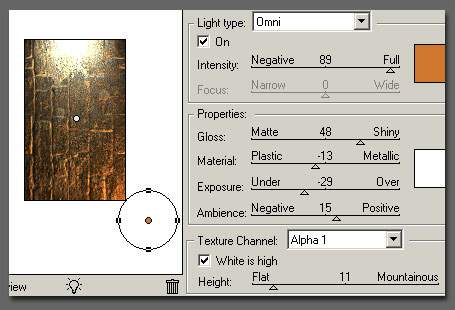
Let's use the same crap textures from the previous tutorial but the other way around now. Let's use the bricks one to lend depth to the second one. So load both of them. And select the one we will be using for lending the depth and put it on the channel. Select all or the marquee, do a copy, select the first texture, select channels in the layers window, select create new, select it and paste it, it will be black and white. Go back, you can discard the second picture now that you have put it in the channels and select the original layer on the first picture so that it comes up. Call up filter ->render->lighting and set up the lights to your wishes, and select alpha1 from the texture channel drop down menu. Here I used a top light in white and an omni light in the right lower corner. Fiddle around the settings, imho the lighting filter interface should get a facelift because it lacks in intuitiveness, so defining the setting usually requires a few tries. After that, you usually have to use the filters -> fade lighting and usually do a blend up to 50% or 80% because the lighting filter usually leads to too strong, dramatic results. Unfortunately, you really have to render the lights, this means you can't change settings later on, so keep backups all the time.
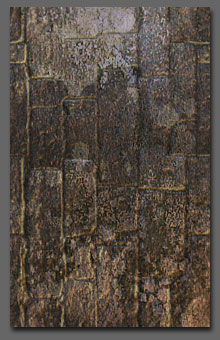
 There,
but to tell you the truth I wasn't happy at all with the end result, these
two textures I chose are really complete crap, that's great, because now
you'll know how to fix up stuff even in the worst conditions, always great
to know when the deadline is coming in on a job, so what did I do?
There,
but to tell you the truth I wasn't happy at all with the end result, these
two textures I chose are really complete crap, that's great, because now
you'll know how to fix up stuff even in the worst conditions, always great
to know when the deadline is coming in on a job, so what did I do?
I went back into the texture we had discarded, the bricks one, pasted it again but this time on the usual normal layer. Then I set the blending of that layer to multiply and 70%.
There, looks way better now: