KOWBOY's kickass 3D Studio Max r3 tutorial
Part 2 - Creating some things
Ok. The first part of this tutorial was easy (I hope). It really should be. This part won't be much harder but you will get to create something and move the stuff around.
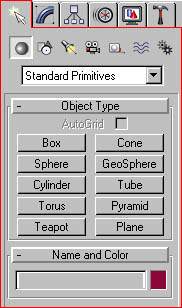
So. What's the first thing to know when you want to create an 3d object in max. Well. I guess that would be where to find the appropriate tools for that... right. If you remember the last tutor, the creation tools are in the right part of your screen. It really should look like this.
Notice that the red outline has been drawn by me to clarify (if any doubts) what the create menu looks like.
The other tabs contain the following tools:
Modify, Hierarchy, Motion, Display, Utilities.

These will be covered later.
The first line of icons under the creation tab contains the groups of the elements that can be created.
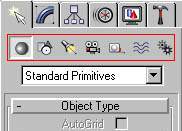
They are:
Geometry (default), Shapes, Lights, Cameras, Helpers, Space Warps, Systems.
Today we are going to concentrate on Geometry.
Below these buttons there is a rollout which says "Standard Primitives". This means exactly what it says, i.e. that you can choose among some standard objects to be created for you.
So let's create something. Let's create a box. Click the box button:

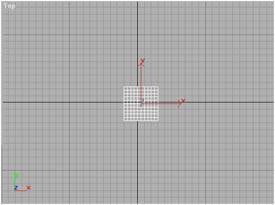
Now click + hold and drag the base of your box in the Top viewport. Then release the button and move the mouse. You will see that the height of the box changes, click again to set the height.
In your perspective viewport you should have something looking like this:
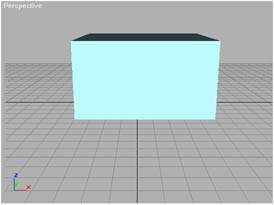
The color might not be the same since it was randomly selected.
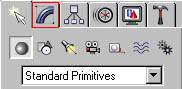
Now that's impressive. Not? Ok. The box isn't very symmetric, and we want a perfect cube. Right? Of course I could have been more careful with symmetry when I created it but it would never be exact symmetry no matter how hard I would try. So how to solve this problem? Easily! Select the box by clicking it and then click the Modify tab, which looks like this (if you don't remember):
Hint/tip: If you are in create mode, which you are when you have clicked a primitive create button, and you want to exit this mode to get the normal select cursor and not the create one, do a simple right click in the highlighted viewport.
Now the Modify tab will be visible and it should look like this:
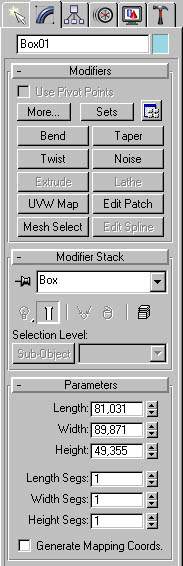
As you can see it looks like the create tab except that you have some modifiers to select from also. Don't mind them. We will go through them later. As Parameters you can see the selected box length, width, height, length segs, width segs and height segs. Let's change the box length, width and height to 50 so that we get a nice symmetrical looking box. Simply done by entering 50 into the corresponding fields.
So what is the length segs, width segs and height segs then? Well that is about how many polygons you want your box to consist of. If you change the numbers to, for example, 10 you will see that the wireframe in the viewports will get much denser.
But what do we have to do in order to render this nice box of ours to an image? We simply select the Perspective viewport (or the one you want to render) by either right-clicking in it or by clicking its name. Then you click the Quick Render button, which is located as the pic below shows (in 1280*1024). You lowres guys will need to scroll the toolbar a bit to the right.
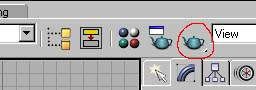
If everything has worked fine, two new windows should appear: one which contains information about the current render job and one containing the actual image. If you want to change the output resolution you can do this by clicking the icon to the left of the Quick Render button. This button is called Render Scene and it can also be accessed via the menu called Rendering and selecting Render. A new window with a lot of different options will appear. Just change the resolution and click the Render button in the lower left corner, and the image will be rendered to the new resolution.
The image we rendered isn't very fun looking at. The box is too far away and viewed from the front. Wouldn't it look cooler if we rotated it and moved it around a bit. But of course it would!
In the Toolbar you can see these icons:
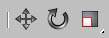
They are the Move, Rotate and Scale tools. Just click one of the tools, select the box and do the preferred action with the tool you selected. You can also select Move, Rotate and Scale by right clicking the box in a viewport and selecting them from there.
Maybe we also want to change the perspective viewport. In your lower right corner you have 8 different tools for changing the look of a viewport.

The tools are and do:
Line1
Zoom: zooms in and out of the selected viewport.
Zoom All: zooms in and out in all viewports.
Zoom Extents: zooms so that you can as much as you can of all objects in the
selected viewport.
Zoom Extents All: same as above but for all viewports
Line2
Region Zoom: zooms the selected region. If it is the perspective viewport you
will change the field-of-view.
Pan: pans the viewport left-right up-down.
Arc Rotate: rotates the viewport
Min/Max Toggle: toggles fullscreen mode on/off for the viewport.
Now I suggest that you create some objects. All different kinds of objects that you can find among the Standard Primitives (and if you dare among Extended Primitives). Rotate them, move them, scale them and play with them. And in the next part we will smack some textures on our babies!