KOWBOY's kickass 3D Studio Max r3 tutorial
Part 1 - Introducing 3D Studio Max r3
3d studio max is a really huge and complex program for making 3d graphics. But don't allow this to scare you because actually, you can make really nice looking pics without knowing every function.
First of all I wanna state that I'm no expert at 3d studio max, I do not work for any company but I am currently studying Virtual Reality at university level so I'm learning. And trust me, you will always be learning new stuff when working with 3d graphics.
In this tutorial I will guide the "newer-used-a-3d-program-guy" to actually doing some nice looking things. In later articles I will also (hopefully) go through some more advanced stuff. I would really like a lot of feedback on these articles so don't hesitate to mail me... ok.
Actually I was thinking of telling you how I created my "divine light" pic for the assembly2k raytrace compo. You can download it from nextempire.com and have a sneakpeek at what I'm going to teach you in these articles. Of course... this will be after we have gone through all the other basic things such as modelling, texturing, lightning etc etc... :)
If you have suggestions about what the following articles should contain, any special effect, modelling technique or whatever you want to be explained: Drop me a mail and I'll see what we can work out.
So let's get started then...
Getting to know the GUI
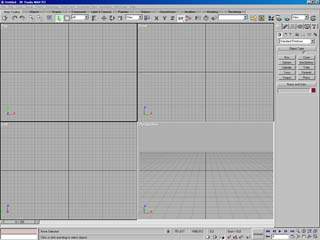
Ok. This is how 3d studio max r3 looks (for me) when it's started.
Actually, the 3d studio max r3 (from now on called max) GUI can be configured to look as you want it to. You can do this, but I don't recommend it since I'm gonna use the standard look.
As you can see there are 4 so-called viewports, top, front, left and perspective. What they show of your scene is quite obvious, they are named after what they show. If you have an opengl accelerated card you can get an opengl preview in the viewports. This is very helpful when you want to see the object you're working with without rendering the whole scene, which usually takes a long time. Of course it is also possible to configure the layout of these viewports, which is easily done by right-clicking on the text in the upper-left corner in a viewport and selecting preferences.
In the uppermost part of the screen you can see the usual rolldown menus as well as the max toolbars. See the picture below.

Note: You might not see the whole toolbar as in the picture. This is because you might be running a resolution smaller than 1280*1024 as I'm doing. In this case, you will have to click and drag it to see the whole bar. This toolbar contains every tool you ever wanna use in max, at least for now.
In the right part of the screen you also have the tools from the toolbar. Actually the icons in the toolbar are "shortcuts" to the main tools at your right. By default the create menu is highlighted. This is the menu where you can, as you might expect, create different objects, elements etc etc...
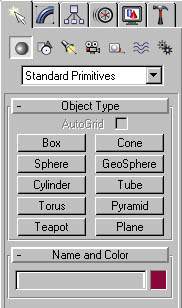
As you can see there are some so called standard primitives which you can select by clicking the corresponding buttons. More on creating stuff later. We first need to go through the GUI. Be patient and you will be rewarded, as a cool guy I know said once. :)
At the bottom of your screen you can see the animation slider and its tools and also the viewport zooming tools.

This is what the max GUI looks like. Perhaps it might look a bit scary at first glance, but don't worry - you will get used to it very fast. So what I suggest you to do is clicking around a bit in the program and getting used to the GUI, and when you're done... go read part 2 and get ready for some 3d creating mania. :)