Some more 'behind the scene' graphics...
is it Zorro? No, just TAD in a mask ;)
Hello you RGB freaks, here is another 'How I did...' article which, like my first Hugi #19 graphics article, describes the techniques I used to create some graphics. This, like all graphics articles, will only show the major steps in creating a finished picture, so you will have to use your own imagination to (flood) fill any gaps (pun, pun).
Again I used Picture Publisher v6 and v8 (PP6 and PP8) in order to create these images, so don't be upset if your paint program uses different terms (such as "Layers" instead of "Objects").
WARNING: You can download a demo of PP8 from www.micrografx.com BUT it will only save pictures in PPF (Picture Publisher) format, and worst of all, the cut/paste functions are disabled (Arrgghh). So you might want to check out Paint-Shop or some other package.
Scanner? You low-life cheat!
I have to be completely honest here, YES, I did use a flatbed scanner to produce the graphics!! (Author pauses while the reader throws his/her final stone in TAD's direction while hurling verbal abuse.)
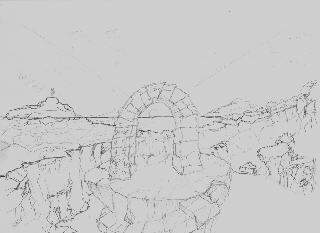
Now, let me explain. Instead of the normal method of drawing I decided to try something different. Using a high-tech pencil and sheet of paper I sketched out a simple arch, stone tower and a very rough landscape. This was captured using the flatbed scanner and saved to disk. After a lot more shading and darkening of the pencil lines the below picture was scanned. It's probably a good idea to scan various versions of your paper sketch, it means you can undo mistakes or reuse parts of the imagine more easily. For example, I drew the main tower and arch first and scanned it without the background.
The image is a little dark because it was scanned using greyscale instead of B/W so most pencil marks appear as light grey instead of black. Using greyscale means shading is more accurately captured, which can make colouring-in much easier. As you probably all know B/W can often leave millions of small gaps in lines where the quantization software/hardware decided to ruin your sketch ;) and it's a real bitch trying to flood-fill B/W gaps.
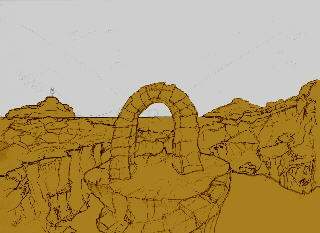
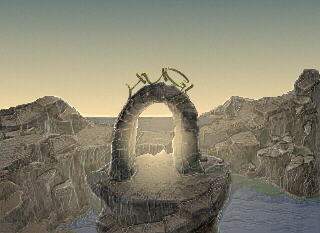
In the above everything below the sky line was masked and then the entire bottom area was "Gamma-Adjusted" to a mustard brown to give a starting base colour for the rocks. As I hope you can see the pencil shading and greyscale capture already gives a good starting point. Trying to draw something like the above using just a paint program would have taken me ages.
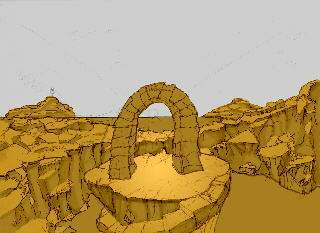
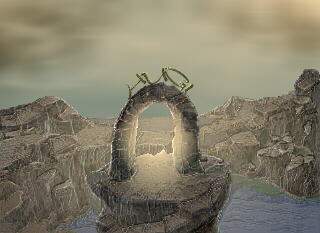
This is a subtle change which helps to bring the flat ground and steps to life. Believe it or not, the above took a while to do. Firsly all the various areas (land, sea, steps, arch and cliffs) all had to be carefully masked and their masks saved to disk. In Picture Publisher you have various options for creating and editing a mask. You can draw rectangles, circles, use the magic-wand tool (which kinda flood fills an area using a % match to find similar areas of colour) you can add, subtract or invert areas, and combine masks from disk. Believe me, the Mask function is a true life saver. Without it you could spend days shading edges etc... Secondly all the near vertical cliff areas were shaded along their vertical boundaries to give the impression of round cylinder-like structures. The shadows (like most of the rock/mountains I tend to draw) are triangluar in appearance. Lastly the flat ground and steps masks were loaded, merged and used to light the main focus point (the arch). This was done using a nice gradient fill using 30...50% transparency with both linear (from horizon to bottom of the screen) and radial (from the center of the arch outwards) fills.
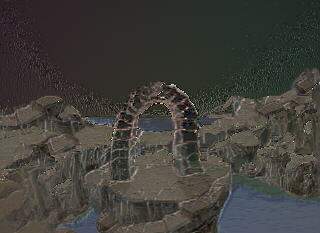
Whoa, huge change! In this version I used a bump-map light source and huge number of Gramma-Adjust + Brightness mods to arrive at the dark murky brown colour. The entire image was copied as an 'Object' (i.e. a 'Layer') and used to boost the highlites. It was also Sharpened to give the rocks/dirt a.. err.. sharper look. ;) If I was drawing a sandy scene then Smooth would have been used together with the rather handy Drag-Morph function. The water was added using the 3 masks from disk with the gradient fill tool and of course my favourite Gamma-Adjust.
The sky mask was loaded and the useful gradient tool (linear) was used to give a rather lame sunset effect. The arch was shaded and its interior space boosted with a radial gradient fill to give the impression of a bright light source in its center. All the image was then carefully shaded and highlited by hand to make the rocks stand out and sparkle like your eyeballs after sticking your head in a flatbed scanner.. heheh.
After trying lots of different ideas I ended up using the "HUGI" letters above the arch. Unfortunately PP6 and PP8 doesn't have any fancy text bending/morph tools, so each letter was rotated individually at 45, 10, -10 and -45 degrees in order to bend the 4-letter word around the arch. A second copy of each letter was filled used a rough texture and then coloured gold. These were ordered behind the dark "H", "U", "G and "I" letters so that only the top right of each gold letter was visible.
Ah, I can't draw a piccy these days without having a cloud or three somewhere. ;) The clouds were created using the Cloud function, Light-Studio, lots of shading by hand (simply using a 30...50 pixel wide round tool and randomly clicking on the clouds to form the dark regions) and of course some Motion-Blur/Smooth effects to soften the cloud edges. The cloud 'Object' (i.e. 'Layer') was slightly merged into the background so give a smooth edge.
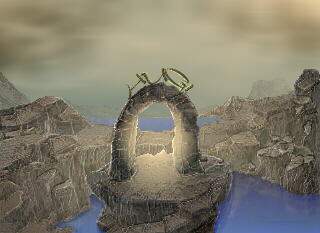
Some copies of the main side rocks were made, scaled down and made 50...70% transparent to merge into the nice clouds. A little bit of green/blue was added to the distant land beyond the top sea area. Also some copies of the rocks were made, flipped vertically and used in the bottom water pools to give a reasonable reflection effect.
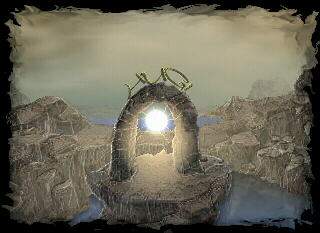
The finishing touches. A large brush was used to brighten a circle inside the arch to act like a white ball 'o' light. Some rough tree like roots were drawn using the same lighten function to give the impression of mini lightning or white electricity striking the archway. A rough burnt edge was added and then saved as a JPEG.
So there you have it; proof that you can use a flatbed scanner for far more than simply ripping other people's artwork (or filling your HD with nude piccies.. heheh).
Happy scanning.