Generating textures for 64k intros
Ever typed "jizz /pandora"?
If you want to know how to put a few megs of textures in your 64k then this document might be of some help. I will try to explain how it is done, so you might be able to do it yourself too. I will not be throwing around sourcecode, because then where would all the fun for you be? :)
The trick is that you don't try to save the actual image, but you create it in little, simple steps. All you have to include in your 64k, is the parameters to those steps, and the code for those steps. This way you can store a texture in about 200 bytes or less. Of course you get more code, but it is really worth it.
Let's just look at how a texgen works.
In a texgen you work with "layers". A layer is basically a temporary texture. Physically it is just a piece of memory the same size as the texture you want, made up of 3 "channels". And yes, those are R,G and B. And yes, they range from 0 to 255.
In my texgen there are 4 layers, but others use 5 or even 6. The amount of layers really isn't that important, but I think 3 would be the minimum.
In a texture generator there should be a few basic things:
- Generation
- Distortion
- Color operations
- Other stuff
It kinda works like this: First you generate something on a few different layers. Then you distort layer 1 by using the data on layer 2. After that, use layer 1 to distort layer 3 for example. Using this technique you can create a huge anount of different textures in only very few steps.
One thing you must take care of, is that all (or most) functions make sure the layers are/remain tileable. The last thing you want is a texture with annoying lines in it.
Generation
First of all, "Generation". We need to start somewhere, right? Here we put pixels on the layers, so we can modify 'em later. The question is, in what manner do we arrange those pixels then? There are a lot of possibilities, and we shall look at the most basic ones.
These are some "generators" that are pretty useful.
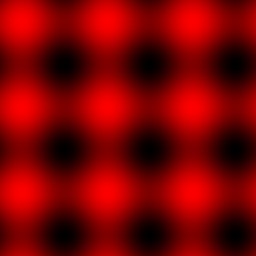
Sine plasma
I'm sure you all coded a plasma at one point in your life, so this
shouldn't be that hard. :-) It boils down to this:
   value = 127 + 63.5*sin( x * something ) +
		 63.5*sin( y * something )
Value now ranges from 0 to 255. Isn't that nice? For the "something"s you use either 1, 2, 3 or whatever integer you like. Then you just say something like: layer[0][(y*256)+x].r = value; (Don't forget those radians. :-))
Environment map
Don't worry, this is really easy. What you do is look at every pixel and determine its distance from the center (128,128). Then say: "The smaller the distance, the brighter the color." So in the center you want color 255, and at the edges you want 0. Mister Pythagoras can be of assistance here. Why is it called environment map? Because you can phong with it of course! :-)

Subplasma
Now things start to get a bit more complicated. A subplasma consists of 2 parts. First you place a few random pixels at specific positions on the layer. Let's say that at every 8 pixels we put a value (random). Then we just interpolate those at the other pixels, so we nicely fill the layer.
Look at this:
   pixel:  0   1   2   3   4   5   6   7   8   9  10
   value: 132  .   .   .   .   .   .   .   45  .  .
At pixel 0 we choose a random value and that is 132 or something. At pixel 8 we wind up with 45. Now we have to find the values for the other pixels. The proper way to do this would be with use of a spline. It creates a nice curve that looks smooth. One type of spline you could use is the Catmull-Rom spline.
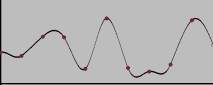
We know the values of the pixels at the red dots (!) and interpolate the ones in between.
Now, all we have to do is find the interpolated value for every pixel, so we end up with this:
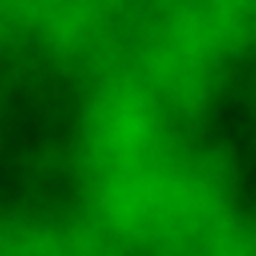
Fractalplasma (Perlin noise)
This is sort of an extension to the subplasma. Think of it as several subplasmas each with different amplitudes and steps. Something like this: First you create a subplasma where the random points are 128 pixels from each other, so you place 4 pixels. Here you say, the maximum those random values can be is 128. Then make another one with stepvalue of 64, and maximum value of 64, etc...
Ok, so you end up with 8 subplasmas. Then what? Well, just add them up! Of course, calculating 8 subplasmas can be a bit slow. :) You could try some alternatives. One is that you don't use a spline to interpolate but just a simple cosine. This eliminates a lot of multiplications you have with the splinemethod, and you can use a table for the cosines.
Another way could be recursive subdivision of the layer. Do you remember those colorcycle plasmas from years ago? They divide the layer in 4 pieces, and each of those in 4 others. And every time you subdivide you add a bit of randomness.
One thing to worry about here (and with subplasma) is the random function. You want it to generate the same values each time you run your intro, or else you have different textures everytime. So we just make our own random function. The trick is that you pass it a value, and then it returns a random number. But, if you pass it the same number twice, it returns the same number twice. It is really easy to do this, just start messing up the bits in the number. Instructions like "xor" and "rol" are really useful here. ;)
Distortion
Ok, enough about generation. Let's look at distortion. Once again, I will show a few filters you should have.
But first something we need: Bilinear interpolation.
The idea behind distortion is that you run over each pixel and assign it another value. That value is another pixel somewhere in the layer, perhaps 3 pixels down and 2 pixels to the left.
But what if you end up with 2.7 pixels down and 1.1 pixels to the
left? Argh! You could of course just round those values, but
then in the end your texture will be crappy. So what you do is you
look at the 4 pixels surrounding your "point". This will be something
like pixels
(x  ,y	),
(x+1,y	),
(x  ,y+1) and
(x+1,y+1)
Then you assign each pixel a "weight", according to the fractional parts of their offsets:
0.7 * 0.1 = 0.07 for the first,
0.3 * 0.1 = 0.03 for the second,
0.7 * 0.9 = 0.63 for the third,
0.3 * 0.9 = 0.27 for the fourth. Note that all 4 weights add up to 1.
So you multiply the r,g,b of pixel 1 by 0.07. Do this for all 4 pixels, add them up and you have your filtered pixel, easy as that. Problem is that it is a tad slow if you do it like this. You have 4 muls for the weigths, and then 4*3 muls for the r, g, b. That is 16 multiplications per pixel. Ouch. If you think about it a bit more, you could even do it with 6 fmuls. I use mmx, which I measured to be about 4 times faster than the 16 fpu-mul version. But I suggest you don't worry about speed right now. Just do that when you have your texgen working nicely.
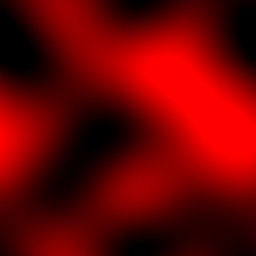
Sinedistort
Here the offsets where you should grab your pixel are defined by (big shock) a sine. Something like this: For pixel 0 the sin() is 0, so you don't really change it. But for pixel 40 the sin() might be 0.55 or something. Multiply that value by a constant (this is another one of those "parameters") and grab pixel (x+xoffset,y+yoffset).
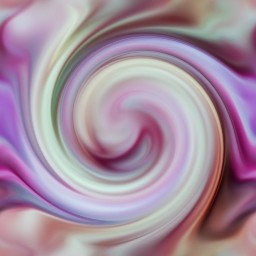
Twirl
This is one you may have used in Photoshop. It turns (rotates) the layer around the center. Hard to explain, so here it is. :)
Mapdistort
Here you use another layer to find your offsets. This layer might have been altered by a number of other filters, and this is basically the thought behind it all: Distort something, then use that to distort something else, and so on. You just take either r, g or b from your datalayer, multiply it by something from 0 to 1, and use it as your offset. Really simple. No picture.
Color thingies
Color changes can be really cool. Once again a few examples.
Invert
This is one of the easiest filters around, but a really useful one. For every pixel you say: "r = 255 - r" (same of course with g and b).
HSV
What the crap is hsv you wonder? Well, it is a colorspace. What the crap is a colorspace you wonder? Well, it is a way to define colors. RGB is one as well. But HSV is more complicated and a lot cooler. With HSV you can rotate the colors, while the intensities stay the same. An example: red can become blue, while white stays white, and black stays black. HSV is really nice to finetune the colors in your texture.
This picture will hopefully explain a bit about HSV.
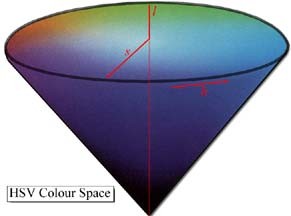
As you can see it is an upside-down cone. Hah! RGB looks like a real wussie with its simple cube. ;-)
The angle is called "Hue". Hue is basically what defines the color, green or yellow or purple or orange or strawberry-red or whatever. So if you rotate all colors by 180 degrees, you get the opposites. But the cool thing is, white remains white, grey remains grey, etc...
The further away from the center you get, the "more pure" the color. So red is really red there. If you get closer to the center, the color gets "whiter", so red turns into pink, and eventually white. This is called Saturation.
The V in HSV stands for Value. It means how dark the color is. In the picture you see that the apex of the cone (the sharp tip ;)) is black. Here Value is 0. In the center of the bottom-circle you find white, Value is 1. I don't think Value is very cool anyway, if you use it you are basically shading your colors. But nobody is stopping you if you want it in your own texgen. :)
The way to use HSV is this: first you convert from RGB to HSV. Then modify each of the 3 elements, and convert back to RGB. The formulas for the conversions are in the bonuspack. I just copied them from the graphics programming book by Foley & van Dam.
Sinecolor
Oh, this one is so simple: r=sin(r). Most of the time this looks really ugly, but sometimes it is way cool.
Other stuff
Mixing layers
Just mix 2 layers. But make the filter in a way you can say things like: 80% of layer 1 and 20% of layer 2. One variation of this filter uses a datachannel to decide those percentages. When the value is 0 you use 100% of layer 1 and when it is 255 you use 100% of layer 2.
Add, Sub, Mul
Well duh. Make sure you use saturation, or your colors may over/underflow. For example: "240+60=255", and "33-80=0".
Blur
Of course the normal blur, but you could do many different kinds. Things like motion blur, gaussian blur or my personal favorite, the directional blur. This one looks at a datachannel and then determines the direction to blur in. If the value is 0 it grabs a few pixels directly above the pixel you are at. If the value is 64 it looks directly to the left.
Shade
Use a datalayer to shade your texture. We do it like this: If the datavalue is 128 then you have your normal color. But if it is 255 the color will be white. 0 is black. Shading is a great way to add some variety in your texture.
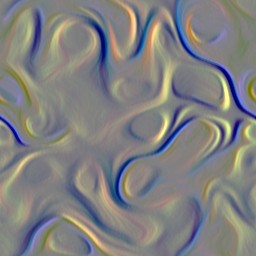
Emboss
Emboss itself produces some weird colors. If you have tried it in photoshop
you have noticed that you get some ugly grey crap. What it does is it amplifies
colordifferences between pixels. It's done like this:
   -1 0 1
   -1 0 1
   -1 0 1
Imagine the middle "0" is your pixel. Then you look at the 8 surrounding pixels, and multiply each by its value (-1, 0 or 1). Add these up, and add 128. So now you have an ugly mess of colors. What you should do with this mess is use it to shade your texture. The 3x3 matrix is the one used in photoshop, but experiment a bit with different values! You could even use 5x5 or bigger matrices.
Pictures
You can store logos or fonts as textures too. Just take a 2 color picture and store it 8 pixels per byte. This is 8Kb per picture. That's rather big, but after compression you won't notice it that much. So you just have that picture on a layer somewhere, ready to be distorted or given some color. Imagine you have a colorful texture on layer 1, and the logo on layer 2. If the logo is black and white, you can multiply layer 1 by layer 2, and voila, you have yourself a colored logo.
If you have some of these filters, you should be able to make some pretty cool textures. The more filters you have, the more possibilities for cool textures of course. Also don't limit yourself to the ones I explained here. Try to invent some of your own.
Now all you need is a loader and an editor. I'll explain a bit about how our loader works. Every filter has its own number, for example Fractalplasma is 4 and Sinedistort is 10. Furthermore, every filter has 8 bytes of possible data (except the picture-filter). In there you store whatever parameters you might have. Sinedistort has 7 parameters:
- which layer
- number of sines horizontally
- number of sines vertically
- maximal amplitude of horizontal sine
- maximal amplitude of vertical sine
- phase of horizontal sine
- phase of vertical sine
The phase is used to determine where the sine "starts".
The Invert filter has just 1 parameter: which layer. But we still store it in 9 bytes. The reason for that is that you can easily add another parameter to a filter, without affecting older textures.
Well, that's it. I hope this doc was any help.
If you want to see an example of a texgen, I released mine and you can download it at:
ftp://ftp.scene.org/pub/demos/groups/aardbei/atg2.zip
If you have any questions please feel free to email me. If you don't have any questions also feel free to email me.