Creating Demos - Coder Tutorial #3
[Movement without Motion]
By Polaris
Greetings demo Sceners! In this chapter I make true on my promise to show you how to make animations without moving anything on the screen! I also will be telling you how to control the speed of playback of the production. This is going to be a really fun issue, so get comfortable... and make sure that Allegro and Dev C++ are handy. I'll be assuming that you have mastered the previous two articles. If not be sure to review them and then come back here. We'll wait.
The Palette of Picasso
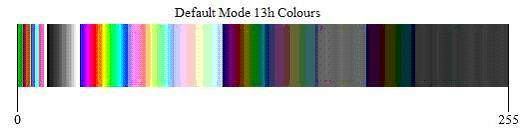
During the last issue we used mode 13h. Mode 13h allows us to draw images with a width of 320 pixels, height of 200 pixels and 256 different shades of colour. We made use of the "default palette" as shown in the picture and drew a nifty snow effect in a variety of shades of white and grey.
I told you what you needed to know to make the effect... but I didn't tell you the whole truth. Now it's time for me to come clean. It's true that mode 13h only allows for 256 colors displayed on the screen at any given time. The screen displayed is a matrix of values 0-255 arranged in a 320x200 grid. Each colour (0-255 value) - is really an index to a palette that defines that colour. Think of the values 0-255 as being a number on a paint can. We have 256 paint cans total. We use the palette to tell the computer the colour of each of our 256 paints.
Laying the Foundation
For our first program we'll make a simple colour transition using the palette. Let's start with a base project, that has the smallest functionality that we need to get started. From there we'll use the iterative development process to build on top of it.
1. Start Dev C++
2. Start a new project [file / new project]
3. Select Console Application, give it a name, and select OK.
4. Save the .Dev file to the folder of your choice.
5. Change the code in main.cpp to read:
#include "allegro.h"
using namespace std;

// main program
int main(int argc, char *argv[]) {

      allegro_init();        // init Allegro
      install_keyboard();    // setup allegro keyboard

      set_color_depth(8) ;   // 8 bit colour

      if (set_gfx_mode(GFX_AUTODETECT_FULLSCREEN, 320, 200, 0, 0)<0)
      {
          set_gfx_mode(GFX_TEXT, 0, 0, 0, 0);
          allegro_message("Failure to init video mode!\n%s\n", allegro_error);
      }

      while ((!key[KEY_ESC])&&(!key[KEY_SPACE])) {
          vsync();
    };

      return 0;
}
END_OF_MAIN();
6. Add the Allegro library to your project as follows:
a. Select Project / Project Options
b. Go to the parameters tab
c. Select add library or object
d. C:\Dev-Cpp\lib\liballeg.a
e. Select ok!
7. Compile!
8. Run!
Okay, I'll be the first to admit that was pretty boring. Let's spice it up a bit
shall we? To start with.. let's add some simple shapes. Just before the while loop,
let's draw two rectangles. We are going to do that with the following function:
"void rectfill(BITMAP *bmp, int x1, int y1, int x2, int y2, int color);"
Insert these two lines of code just before the while loop like so.
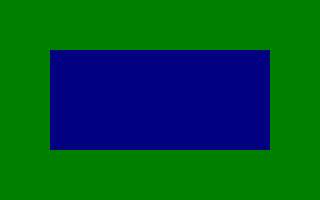
            rectfill(screen, 0, 0, 319, 199, 2);

            rectfill(screen, 50, 50, 269, 149, 1);
Go ahead and run the program. At this point we have a large green background from (0,0) - (319,199) [upper left to lower right]. Inside that green square we have a inner blue square from (50,50) - (269,149). We've used the default colour 2 (green), and colour 1 (blue). Now... we know that these colour values 2 and 1 are actually indices to a palette.. But how is the palette defined? Remember from the last article that each pixel is actually values of Red, Green and Blue. To define a colour in our palette, we specify a range of intensities of red, green and blue values. This is called RGB, and is represented in the following structure with 3 values ranging from 0-63.
typedef struct RGB

{

   unsigned char r, g, b;

} RGB;
For example, the colours we used are be defined as:
   RGB Green2 = { 0,  42,  0  };

   RGB Blue1    = { 0,  0,  42  };
What happens if we change the palette for index 1? Well, we change any pixel on the screen that was drawn with that colour index. Notice that we aren't moving any pixels, we are only changing the RGB value of the colour indexed in the palette. Let's do that now!
Start your Stop Watch!
During our last issue of Scene Rep, we controlled the speed of the snow using a hack. We introduced multiple waits for vsynch(), knowing that would cause us to wait for an interval. While we knew this interval would vary from system to system, it allowed us to control the rate of snow on our individual machines. I promised to show a better way, and now I will. They key to alter the timing of our effects, is to get timing from the system. Luckily Allegro has some functions to do this.
There are three basic timer functions. These are:
- int install_timer();
- void remove_timer();
- void rest(long time);
These functions are relatively self explanatory. Install_timer() is used to install the timer, and remove_timer() is used to de-initialize the timer. Rest() takes a value in milliseconds and will cause the computer to pause for that number of milliseconds. Instead of adding a number of vsynchs in our main loop to control the speed of the main loop - we'll use a rest(). Since the value is in milliseconds, it will not change between platforms. Now... we know how to time things... and we will work to the goal of changing the palette to vary over time.
Using the Modulus Function
The modulus function is by far one of the most useful functions in our arsenal. We used it in the first tutorial to test for even and odd numbers (to control if we drew a 0 or a 1). This time we are going to generate a number sequence 0-63. The integer Modulus operator is the % symbol in C. When we calculate X % Y (also known as X mod Y), we are calculating the integer remainder of X divided by Y. This will always range from 0-(Y-1). This is because the remainder can never equal or exceed the divisor.
So... you can imagine that our program will have a global counter.... always increasing, based on the timer. Its rate is controlled because we will loop around a rest statement pausing for a specific duration of milliseconds. We will obtain a range of 0-63 by taking our loop counter and calculating the modulus of 63. We will set our RGB value of colour 1 to be { i % 63, 0,0 }. When this runs... the blue square will start black... grow to the full intensity of red... and then black again... repeating.
Rudolph the Red Nosed Reindeer
Let's make changes to our most recent framework to make this happen. Follow the following steps:
1. We need to add two variables to our program. At the start of the main function add the following variable declarations:
int i;
RGB OurColour;
2. We also need to seed these values. Add the following code under the declarations to do this.
OurColour.r=0;
OurColour.g=0;
OurColour.b=0;
i=0;
3. Add install_timer(); and remove_timer(); to the program. You should add install_timer somewhere after allegro_init();, but before the main loop. You should add remove_timer(); just before return 0.
4. At this point we extend the main loop to appear as follows:
while ((!key[KEY_ESC])&&(!key[KEY_SPACE])) {
            i++;
          OurColour.r=(i%63);
          set_color(1, &OurColour);
          rest(80);
    };
Voila! If you run the program... it will change our blue square to a black square that becomes red... then black... then red. You will notice that while it's smoothly moving towards red... it abruptly jumps back to black. Experiment with this to try to make a smooth transition. Try other colours, and have some fun with it.
Let's Animate!
While it's delightful to change a colour on the screen... you can debate that I haven't kept my promise. We didn't really animate something... or at least not in the traditional sense. Now.... It's time to fix that. We are going to use the palette to do a traditional old school effect. This time however; we aren't going to just base it on code that I've designed. We are going to make use of some code and tools that are available on the internet.
FTP://X2FTP.OULU.FI
This ftp site is the most classic demo coding site in the universe for pc demo coding. It has retained its roots in PC demo coding as well; as it never adapted to a post ms-dos world. The content is classically old school. While the site is no longer available from its original home, it's possible to find mirrors. On one of those mirrors lies wormhole.lzh. LZH is a compression format typically used in the Amiga scene. I've converted the files in wormhole.lzh to a zip file included in the bonus pack of this Hugi issue. I've done this for your convenience only, if you want to extract wormhole.lzh - find a copy of LHA.EXE and use the command "lha e wormhole.lzh". Once you've downloaded the archive - have a peek at these files.
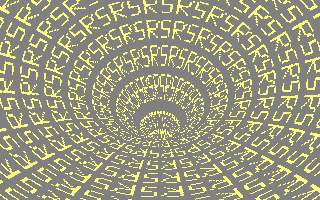
WORMIT3.EXE - Is the effect we are going to simulate.... You can see the letters smoothly move around and flow down into the wormhole. Don't stare at it too long... or you will get sucked in too!
WORMHOL6.EXE - Generates a beautiful blue and purple image of a wormhole. Nothing moves when you run this program. Ironically however, this is the exact same image as wormit3 displays. (Notice it's the same image with a different palette).
WORMHOLE.TXT - This describes how the technique works... but you might find it confusing. I'm going to describe it in detail.
How does the Worm Hole Effect Work?
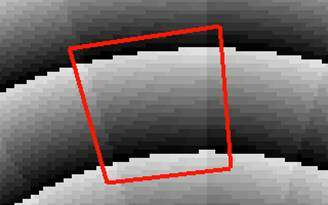 Have a close look at the results of wormhol6.exe. You may notice that there are several
"wedge patches". We are going to concern ourselves with just one wedge. Have a look
at the wedge image. I've changed the palette to be grey scale. Colour index 0 is
dark black... and colour index 256 is full white. You can see that that the upper right
part of the wedge starts close to full white, and decreases in intensity from
right to left. The next row picks up where the other left off. In essence... we have
a ramp of colour indices in our "wedge patch". If we straightened this out... we would
have a 2x2 matrix of colour intensities that looked like this [starting at 225]
Have a close look at the results of wormhol6.exe. You may notice that there are several
"wedge patches". We are going to concern ourselves with just one wedge. Have a look
at the wedge image. I've changed the palette to be grey scale. Colour index 0 is
dark black... and colour index 256 is full white. You can see that that the upper right
part of the wedge starts close to full white, and decreases in intensity from
right to left. The next row picks up where the other left off. In essence... we have
a ramp of colour indices in our "wedge patch". If we straightened this out... we would
have a 2x2 matrix of colour intensities that looked like this [starting at 225]

All of a sudden we have a new meaning to painting by numbers! You will notice that I've added a design to our matrix. For our project we are going to animate "SR" in a wormhole. Imagine for a moment how this all works. We start with a palette where values from 1-225 equate to our design. For our base SR animation, colour indices 32, 33, 34, 35, 39, 44 - etc... all get set to a colour of our choosing in the palette. Essentially we've taken our palette and broken it down into a grid to animate motion on the screen. Now... what happens if we shift the values of the palette? We set palette(colour index) = palette(colour index+1). (wrapping around the end of course) .... Well.. colour 31 gets the palette value for 32. Colour 32, gets 33... colour 33 gets 34... etc etc! Imagine that while looking at the grid. You should now see that it will shift the SR image left by one square. We haven't changed the pixels on the screen - they are all pointing to the same colour index... we've adapted the palette to cause animation!
Down the Rabbit Hole We Go!
At this point it's time to start making our SR wormhole animation. I've done a bunch of the grunt work - so you don't have to. Here are the steps I've performed [Just in case you are trying to reproduce the result.]
I captured the output of WORMHOL6.EXE to an image file we will be able to load and display in Allegro. I used a program called Screen Thief for DOS v2.01 [st201f.zip]. I called this file worm_capture.pcx. PCX files are a simple image format. They include both the image data [colour indices in a 320x200 matrix] as well as the palette in their files.
I loaded worm_capture.pcx into a program called IMPROCES [improc42.zip], created by John Wagner. I used IMPROCES because it's an old school program that lets me manipulate the palette. The author released registration keys on his homepage to make the program freeware - but it appears his homepage has fallen into the digital abyss. I edited the grey coloured indices in our matrix - to give me a new palette, setting our SR values to 63,63,32 [yellow], and our non SR values to 32,32,32 [grey]. (In Improces this is done by selecting the Colour menu and the set colour option.) When you are finished the program will ask you "Best fit onscreen image to new palette?". You must select no. Otherwise it will try to adapt the image indices of the old image to try to make it appear like it used to with the new palette. Once complete, save this pcx image as SR_WORM.PCX. You will notice our new default palette looks something like this:

Voila! We now have the golden SR_WORM.PCX. This has almost everything we need to animate a worm hole effect on the screen. Now, let's make use of SR_WORM.PCX
Building the SR Wormhole
 Start a new project using your usual procedure. Add SR_WORM.PCX to the folder.
The pcx file is included in the bonus pack to this Hugi issue (image_package.zip).
Start a new project using your usual procedure. Add SR_WORM.PCX to the folder.
The pcx file is included in the bonus pack to this Hugi issue (image_package.zip).
Now, add the following code to your project. You will notice that its basic structure is the same as before, but will also shuffle the palette values 1-225. This leaves 226-255 open to being used without being affected. I took advantage of this to add the text http://www.scenerep.org to the production. The new lines in the code are highlighted in blue. You'll notice that I removed the vsynch. That is because Allegro palette operations actually include the vsynch themselves, so adding a vsynch is redundant.
#include "allegro.h"
using namespace std;

// main program
int main(int argc, char *argv[]) {
            int i; // global counter
            int j; // palette rotation

    RGB WrapColour; // colour that wraps around
    RGB TempColour; // Regular temp colour

    BITMAP *the_image;    // the image from the pcx file
    PALETTE the_palette;  // the palette from the pcx file

    // allegro setup
            allegro_init();        // init Allegro
            install_keyboard();    // setup allegro keyboard
            install_timer();       // install timer

    // init seed values
            i=0;    // time count
            the_image = load_bitmap("SR_WORM.PCX", the_palette); // image load

    // init video mode
            set_color_depth(8) ;   // 8 bit colour
            if (set_gfx_mode(GFX_AUTODETECT_FULLSCREEN, 320, 200, 0, 0)<0)
            {
                set_gfx_mode(GFX_TEXT, 0, 0, 0, 0);
                allegro_message("Failure to init video mode!\n%s\n", allegro_error);
            }

    // set the bitmap palette [all 256 colour indices ]
    set_palette(the_palette);
    // blit the image onto the screen
    blit(the_image, screen, 0, 0, 0,0,320,200);

    // lets play a little - set index 255 to full white
    TempColour.r=63;     TempColour.g=63;     TempColour.b=63;
    set_color(255,&TempColour);
    // Draw some text
    textout_centre(screen, font, "http://www.scenerep.org", 160, 50, 255);

            while ((!key[KEY_ESC])&&(!key[KEY_SPACE])) {
                  i++;
                  // cycle palette now
                  get_color(1,&WrapColour); // save palette 1 - become 225 later
                  for (j=1;j<225;j++) {
                         get_color(j+1,&TempColour);
                         set_color(j,&TempColour);
                  }
                  set_color(225,&WrapColour);
          rest(1);

    };

    remove_timer();
            return 0;
}
END_OF_MAIN();
Coming Soon!
Well folks, I hope this issue sucked you in and got you excited for even more demo scene goodness. Next issue I'll bring to you one more palette trick - cross fading. I'll also talk about morphing and tweening to make some cool on screen animations.
Until then - play, code and have fun. Let me know what you create, or even better - let me know what you would like to create! I'll be glad to feature tutorial requests.
Stay frosty!