Lightwave - Radiosity, the cornell box example.
All you need to know about the cornell box is that it was created as an art thing / study of the behaviour of light, and it was built as a model in the 'real' world. And it now has become the usual example with 3d packages to demonstrate how well their packages simulate caustics and radiosity, so well it looks like the real thing. Mental Images, the German producers of the ass kicking mental ray, the renderer used by Softimage and XSI (actually also available as a plugin for 3ds Max and Maya but with its limitations), were the first ones to put out a renderer that did it, but now that Lightwave is featuring radiosity and caustics (another great renderer btw) we're going to use that too to give us an example of Lightwave's capabilities. Keep in mind though, that mental ray coupled with Softimage or XSI is still the best thing around, the final gathering option alone makes it unbeatable.
Creating a cornell box is pretty easy, but in the path of doing it we're going to learn how to deal with layers in Lightwave, surface attributing and a couple of other things. You'll notice how Lightwave is such a breeze in dealing with all this, this will look like a kid's game - not so with other 3d packages.
The first thing is first, create a cube (objects->primitives->box) and pick the polygon selecting tool at the bottom.
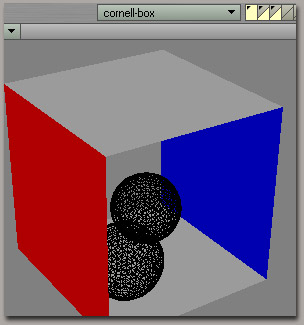
Now this part is probably the hardest one, not because it's really hard, but because for some reason it was a bitch for me to select the correct sides. Anyway, just select the left side, press q and write in red, do the same thing for the right side but with blue (see picture below), then select the side in front to you \ the camera and select cut from the bar in the bottom, you can see now it's gone. There, now you witness how easy it is to attribute multiple surfaces to a single object, it can't get easier than this.
Now let's deal with the layers, check the top of the screen for those bar buttons divided in two (see picture below). Here's the deal, each bar is a layer, every time you press the upper part you select the whole layer so you will see it \ edit in full. Yes you can edit as many as you want at the same time (just press shift to select more than one at a time), but when you press the bottom part you just select it as a backdrop, that is, you will see them (in a black wireframe) but they won't be edited. This is great, every time there's something on a layer there's also an arrow in it. The really cool thing, like everything in Lightwave mostly due to it's Amiga background, is how easy it all is.
Now just select the whole second layer and select the cube layer as a backdrop, nice, now create a ball (objects->primitives->ball) and position and size it as is in the picture below, press enter, press q and call it mirror if the ball is in the background and call it glass if it's the one closer to the camera \ exit.
Now, go into the surface editor, and get the default surface and tick double surface, that way we will see it from the inside, do the same for red and blue and, of course, make them red and blue as is on the picture below. :-) Now in the glass surface change the following attributes: diffuse 0, specularity 200, gloss 50, reflection 10, transparency 100 and refraction 3.0, tick smoothing and select it as black colour. For the mirror select the black colour as well and only change specularity to 200, gloss to 70, and reflect to 100; tick smoothing. There, done, our work in the modeller is over. Save up, and fire up layout. Our work is pretty much done.
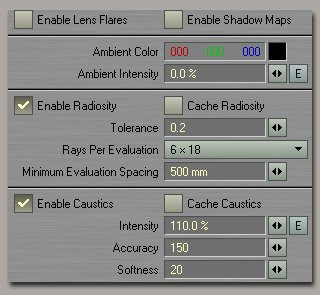
Now in layout you'll only need to load up the object, select the light already there and change it to an area light (bottom bar, light, item properties) and put it to 80%, tick caustics and tick radiosity. Place it right above the balls :-) and direct it to the ground. Now let's tweak the radiosity and caustics settings. Check the settings below:
Now place the camera and don't forget to set up the shadows, reflections and refraction on (settings->render->render options). That's it folks. Hit render. Guess what happens:
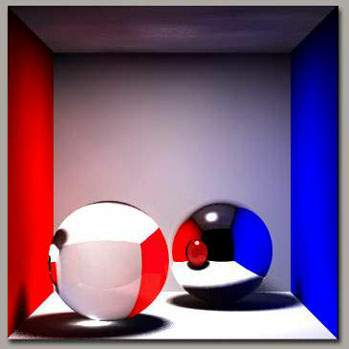
Pretty! Balls in box! Me likes. Use your imagination, pools, water, glassy logos, rust, translucent blood, mirrors, volumetric lights, fog, metals, well, the possibilities are endless for the creative mind. Enjoy.