KOWBOY's kickass 3D Studio Max r3 tutorial
Part 4 - Lights on baby!
To make a nice looking 3d picture you will have to put some lights on it. There is no way you can make a picture look really good and realistic with the standard lightning. So let me introduce you to the lights of max r3.
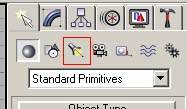
In the creation menu there is a little icon looking like a spotlight.
Click that and you will see the lights rollout.
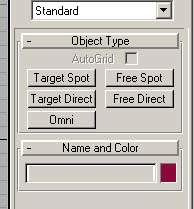
As you can see there are 5 different standard types of light which you can select from. The target spot and target direct are lights which you can aim at a certain target. I.e. they have a target which you can drag and move in the viewports. The free spot and free direct don't have this target and can therefore not be aimed at a certain point in the same easy manner. The spots and directs cast light in a certain direction, which the omni doesn't. An omni light casts lights in all directions, much like a light bulb hanging freely in a ceiling. The difference between spots and directs is that spots behave like spotlights, hence the name spot. Huh? Yes it means that the lightbeams originate from the source and diverge from it. Diverging means that the beams go away from the source in a non-parallel manner, the distance between the rays is growing. Take a look at the nice picture to see what I mean.
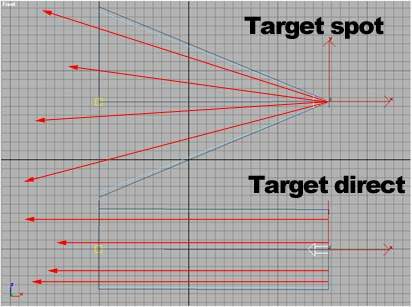
Yes. The red arrows indicate the directions of the rays.
If we create a Target spot light and take a look at the parameters it has we can easily see that there are a lot of them. Let's go through some of them. The option bar looks like this:
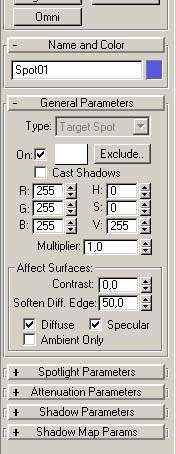
The first expanded rollout is General Parameters. The easiest way to learn about how lights work is actually to play with its properties and see how the result comes out. This is what I think you should do. I will explain some nice options to know though.
The first option is a button called On. This button is checked by default since you want the light to be "on". With this button you can switch the light on/off. By clicking the white box to the right of the On box you can change the color of the light.
A sometimes useful parameter is the Multiplier parameter. By default it is set to 1 but if you change it the lights intensity will be multiplied with this value. I.e. if you enter 0.5 the light will be half as bright and 1.5 will make it brighter by 50%.
A button you really should know of is the Cast Shadows button. A light that doesn't cast a shadow doesn't feel real so you should always have shadows on. There are two types of shadows as defaults: Shadow Maps and Raytraced Shadows. Difference: Raytraced shadows are more precise and accurate but heavier to calculate. Shadow maps are selected by default and this type will do just fine in most cases but then sometimes you will have to use raytraced shadows. Usually you cannot see the difference between these two types of shadows.
To change the type of shadow you want, expand the Shadow Parameters menu.
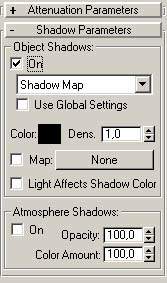
In the little rollout which says Shadow Map, simply select Ray Traced Shadows and poof. Your shadows will now be raytraced.
The Spotlight Parameters rollout also contains some useful things. Expand it and this is will be what you see...

Here you can change the spotlights Hotspot and Falloff. The Hotspot is the brightest area where the light is illuminating. The Falloff is the area where the light fades off into black, i.e. where there is no light. Take a look a these two pictures to see what I mean:
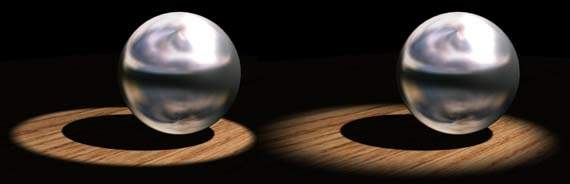
As you can see the right picture has a falloff almost twice as big as the hotspot whereas the left picture has a falloff only two units larger than the hotspot.
The Projector Map option can come handy sometimes. With this you select a black and white bitmap, where white is translucent and black is solid. I.e. the light will shine through the white areas and it will be stopped by black areas. For example. The first picture below shows the Projector Map, which looks like a flashlight, and the second shows how the light will look when hitting a surface.
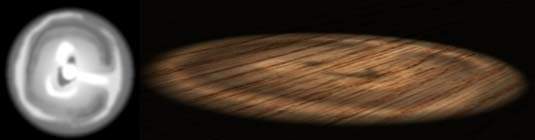
Does look like a flashlight... doesn't it...
With this technique you can easily simulate the sun shining through some treetops without actually modelling the trees, which can be very time consuming.
This was all the options I planned to go through at this time. Now try to make some scenes and put some lights to them. Experiment with the settings and play around.
Something to keep in mind when lightning a scene. If you use only spots and directs the scene may look a bit artificial. Try adding some background lightning, some ambience lightning. Use omnis to do this since they are very good for this. You should also have shadows on for all of your lights when you are starting to put lights to your scene. Then, after you are done, you should remove/turn off some of the shadows if (and only if) there are strange looking shadows in your scene. When you do outdoor scenes you should stick to directs and not spots since sunrays hit the earth parallel to each other, which makes the directs your ideal choice.
That's it for now. Next up is a tutorial on how to set up cameras and some simple animation.
FEEDBACK please! :)